| « Raindrop Hillocks and Ground Ice | The Curious World of Ice and Snow: Part 2 of 3 » |
The Curious World of Ice and Snow: Part 3 of 3
These 14 slides are the final (third) section of my Science Cafe talk. (Plus two slides added as an introduction.) As in the previous section (previous post), this section mostly has ice forms that come from the melt, but the ice shapes here are a little "hairier". And at the end we return to forms influenced by the vapor. As with all these forms, I doubt any could have been predicted before their discovery. Nature is complicated, so Nature surprises us.
Click on any image to enlarge it.
As before, the green font below shows the content of this section. The first five cases involve melt flow along surfaces and in narrow pores. Remember that melt is another name for liquid. (The term melt is more accurate though, as it implies pure water, whereas liquid could be water mixed with any solute. For example, salt water is a liquid, but it is not melt.) As mentioned in part 2, their formation from the melt means that they tend to grow relatively fast and large.
First up is perhaps the most common. Do you know what is going on when the ground becomes crunchy?
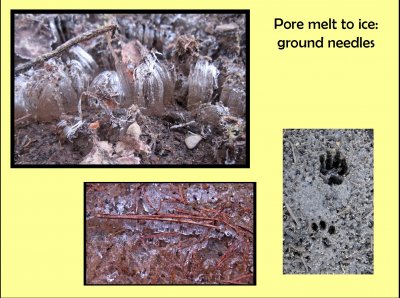
The crunch is the breaking of "ground needles". At left top we see typical ground needles. What is happening here is that the ground contains some melt (i.e., water), but the top is cooling. When the top freezes, the melt flows from below to the ice, known as the "freezing front", producing more ice. The new ice pushes the older ice up, and in this way the ice rises above the ground. The freezing front is near 32 F or 0 C (actually, slightly below), and this temperature generally, at least at some point, will be below the surface. As a result, some of the soil particles above this line will get pushed up by the ice. This is why you see pieces of dirt and rocks being pushed up by ground needles.
The case at bottom left is similar, but the ice has formed preferentially under the pieces of wood. Look close and it is like the ice needles are pallbearers holding up a casket, in this case a twig. The ice formed here first probably because the wood pieces cooled faster than the dirt. And this faster cooling may be due to two factors: 1) by sticking up a little, it radiated more heat away (just as hoarfrost tends to be larger where the surface sticks out), and 2) for a given amound of heat loss, the wood would cool more due to having a smaller heat capacity (step barefoot on wood or stone of the same temperature, and the wood will feel warmer).
The case at right puzzled me at first. Then I realized that the footprints must have pushed the soil lower, below the freezing front. Around the depressed pawprints, the ground needles, which are very dense here, pushed the soil up. This made prints much deeper.
Looking at a rice field with a lot of needle ice one morning, I saw some spots that were distinctly whiter. Looking closer, I noticed that the ice had grown up off the top of a small pebble. So, I called them "pebble caps". Pebble caps were few and far between, but I regularly saw them. In three of these pictures, you can also see some needle ice nearby, being somewhat darker than the pebble caps.
Whereas the melt water flows through pores in the ground to the freezing front of ground needles, with pebble caps, the melt seems to flow along the surface of the pebble to the freezing front.
This image shows "ribbon ice", all of which came out of that little plant stem. Hard to believe, isn't it? This type of ice forms near the surface of the stem, just like needle ice forms at the top surface of the ground. I've never seen it on plants around the Pacific Northwest, but apparently occurs often in several East Coast locations. But this particular one was found in India. It was taken by my colleague Brian Swanson and made the cover of the famous glaciology journal.
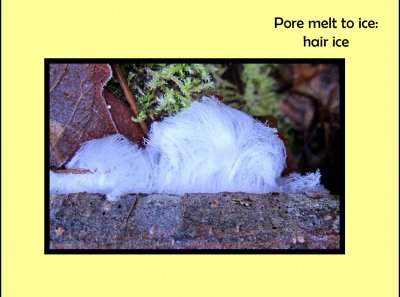
This is "hair ice", growing out of an alder log. The form is similar to ribbon ice, except it consists of fine fibers of ice instead of thin ribbons. Each ice fiber is roughly the same diameter as the pore from which it exited. Within the pore, melt water flows to the surface. Freezing at the surface forces the fiber outward, just like with ground needles and ribbon ice.
In general, when two pieces of ice contact, they start to merge, or sinter together (like particles of clay baked in an oven). That the hair ice does not do this spurred some research in Germany, finding that a fungal compound on the wood inhibited the sintering, allowing the fibers to remain separated, like hair.
At this one park in Japan I found this little rock with something white on it. Looking closer, I realized that is was like hair ice, but shorter. So I called it "rock hair". I looked around for other rocks in the area, and have kept an eye out for rock hair elsewhere. No other rocks had this hair. (Subsequently, I've found similar cases on pavement.) But this one rock regularly produced the hair on other mornings.
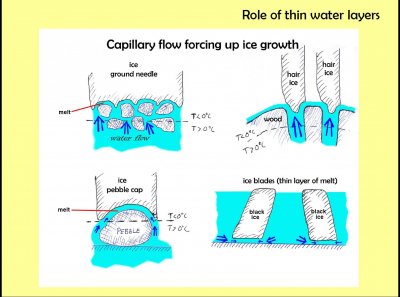
Here is a sketch I made showing the melt and ice in several cases discussed here. In all cases, there is a thin layer of melt between the ice and the supporting surface, whether dirt grains, woody material, pebble, or pavement.
Here is one of the farmer's tubs that I mentioned earlier. When I saw this view one cold morning, I mistakenly thought that a chunk of ice had fallen off the roof of the nearby shed and onto the tub. But as the inset shows, the ice is actually part of the surface, not just a piece resting on top.
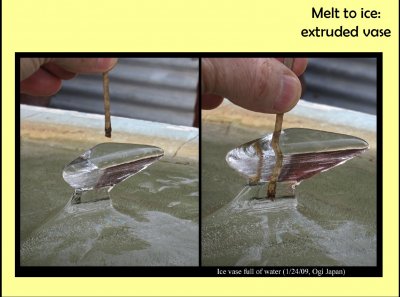
This closer look shows the ice feature more clearly. It is an unusual case of an "ice spike". I called it an "ice vase" due to its shape. At first I thought it was solid ice, but when I accidently bumped the tub, I saw the top of the vase jiggle. So, it was still melt inside. I grabbed a nearby twig, and tested this idea, finding that I could push the twig through the melt down to where you see in the right picture. In retrospect, I should have found a thinner piece to see if a smaller-diameter hole penetrated all the way into the main reservoir below. Oh well, that is how it usually goes.
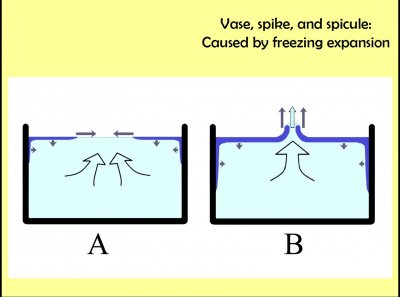
This sketch shows how the vase (and other spike-like) features form. The melt water is cooling, mainly from the sides and top. Once the water temperature gets below 4 C, any further cooling results in water that is less dense and thus flows to the top. Thus, the ice first forms at the top, and usually at the edge. As the tub keeps cooling, ice spreads towards the center and down the inside wall of the tub (at least on its colder sides). When melt water turns to ice, it expands, thus taking up greater volume. The remaining melt must move out of the way, and the only way is up through the center. This is situation "A" in the sketch.
Now, in most cases, this melt water just floods the existing ice (which likely produces some of the surface texture I mentioned before) before freezing. But in rare cases, the flooding doesn't really get started until the ice has nearly covered the entire top surface, where just a small hole remains. In this case, if the rate of cooling is just right, the flooding freezes right away, building up wall of ice around the hole. This process can produce walls going up at various angles: pinching together to make a hillock, continue up parallel to make either a short spicule or a longer spike, or spreading apart to make a vase like that above.
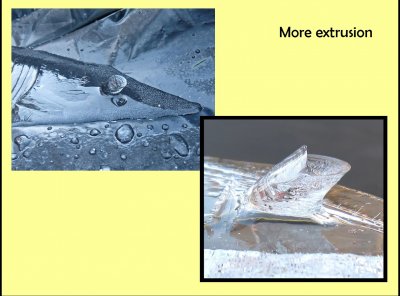
Smaller pools of melt have smaller spike features, like the one pictured above. Notice that the melt does not need to be in a container: the ice itself forms the walls on the side.
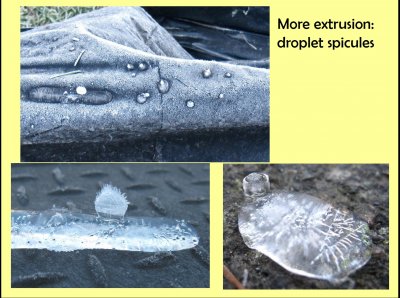
And some more small spicules. The one at bottom left has hoarfrost on top, giving it a fuzzy look.
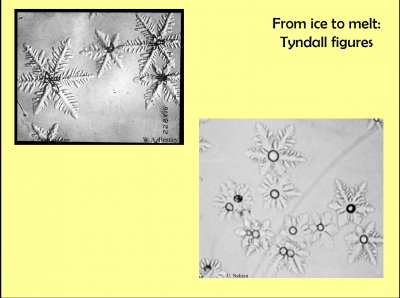
This expansion of water upon freezing also goes in reverse: contraction upon melting. One result of such contraction is Tyndall figures, pictured above, which occur within solid ice. These are named after John Tyndall, a 19th century physicist who observed them in glacial ice illuminated by strong sunlight. The sunlight produces some melting internal to the ice and a vapor region forms due to the contraction. Wilson Bentley observed them in lake ice (top left), but as with those seen by Tyndall, the internal figure is a vapor cavity within the ice. The ones at top left are from the popular book "Snow Crystals" by Bentley and Humphreys. The ones at the bottom right are from an extensive laboratory study of them by Ukichiro Nakaya. In these, you can see the melt as the small circle in the center.
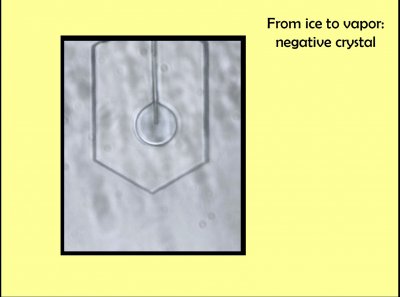
In the laboratory, I once created such a vapor cavity directly. The picture above show most of a hexagonal crystal that was grown from the tip of a glass capillary, shown coming down from the top and terminating inside the crystal. I connected the other end of that capillary to a vacuum pump, and eventually, the circular cavity formed inside. Upon turning the whole crystal (capillary) around to the side, I could see that the cavity was very thin--just slightly wider than the capillary itself.
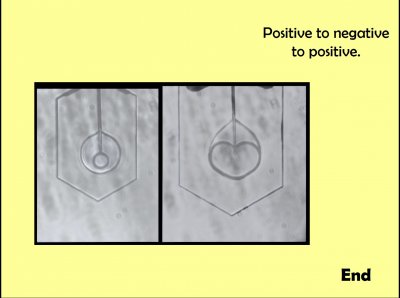
Quite unexpectedly, a crystal nucleated at the tip within this thin-disc-shaped vapor cavity. At the left, you can see it is much smaller than the vapor cavity. As it grew, it pressed up against the ice at the bottom, never quite merged with that ice due to the vapor gap (right image). At the top, shielding by the capillary, I think, caused it to bulge around the capillary, forming that heart shape.
As I said at the end of the previous section, you never know what you might see with ice forms on a cold day. This last example shows that the same hold true even in the relatively well-controlled conditions of a laboratory. Ice is indeed a curious world.
--JN
