| « Poster on corner pockets in snow crystals | Strange dry shadows » |
Puddle gets its grooves (upon freezing), part I
These grooves appear on the surface of frozen puddles.
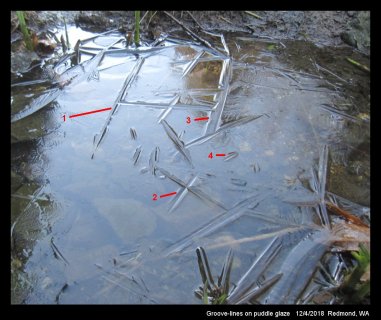
Most grooves are straight lines, and most of these also appear to have relatively symmetric sides, such as those marked #s 1, 2, & 4 in the above image. But some, such as #3, have sides that are much wider. Grooves can intersect each other at a "T" intersection, such as #1 and #3, or they can cross, as a 4-way intersection as in #2. Some, such as #4 start and end on nothing apparent and intersect no other grooves.
Sometimes the sides show small steps or sub-grooves, particularly on the wider sides, such as on #3. On grooves that curve, such as in #1 and #2 in the image below, one side can have a fern or foliage type of texture.
When I first observed them years ago, I tried to imagine how a single crystal could produce such a groove and if these were similar to the ice blades that quickly grow across an ice surface. But then I stepped back and simply wondered what they were.
This winter, I came to a partial answer. I found that a given groove is not from a single crystal, but instead appears to be a bicrystal, with one side being a basal plane (or close to a basal plane). One way to determine if a crystal surface is basal is by placing the crystal between crossed polarizers (or polaroids).
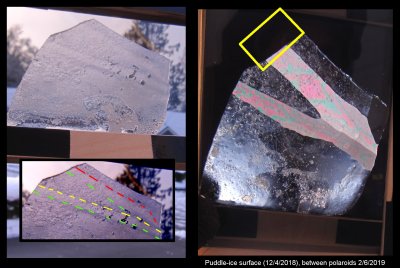
From the above puddle, back in December, I cut out two pieces of ice that had one or more grooves. I put them in a plastic bag, and then into my kitchen freezer. My polaroids were nowhere to be found, so I ordered a new set. By this time, our outdoor temps warmed above freezing, not to cool back down for nearly two months. So, I got the ice out one cold February morning, and got the following images.
On the left, the crystal is fresh out of the bag, full of bits of frost from its 2-month storage in the freezer. No worries though, such little bits shouldn't affect the experiment. In the inset at bottom, I marked a red line approximately where I thought the groove is. On the right, we see the same crystal between crossed polaroids. The black band indicates the basal orientation. Below this band is the other side of the groove. This side has some light transmission, indicating a non-basal orientation. Thus, it appears the groove has one side as basal, the other side non-basal.
I repeated this on the other crystal.
This one had two grooves. You might make out two bands in the crystal image at left, where it is just resting against one polaroid. The inset at bottom marks what appear to the groove centerlines in red and yellow, and then another boundary in green. Between crossed polaroids at right, it does appear that one side of each of these grooves are basal, or nearly basal, because they are nearly black. Thus, this case looks consistent with the previous case: one side of the grooves are roughly basal, the other side non-basal.
Back in December, I tried a different method to determine crystal orientations—I tried growing hoar frost on them and then observing the orientation of the hoar. To do this, I placed the ice on top of my car parked outside at night, facing up. The next morning, I took some pictures. The following is one such picture.
This picture came from roughly the yellow rectangle from the previous cross-polaroid image. (This part later broke off when I set up for the polarizers.). The groove lies between the regions marked "2" and "3". In region 2, the crystal orientation appears to be one with basal planes on the left and right side, parallel to the plane that would be generated if you folded up the photograph at a 90-degree angle, with the crease (fold) along the groove. The image is not very clear though. In region 3, the hoar crystals appear as hexagons, indicating the basal plane is the same as the plane of the groove side. We see similar crystals in region 3. Thus, this roughly done experiment seems to confirm the basal orientations of one side of the groove, while suggesting a different orientation for the other side of the groove.
If the above orientations are correct, it indicates that both sides of the groove have fast-growth directions along the groove. Hence, the groove should grow relatively fast across the water surface. I haven't tried to observe the grooves while growing, but that would be a useful experiment. Nevertheless, one can see support for this "fast-growth" idea by observing other cases, such as that shown below.
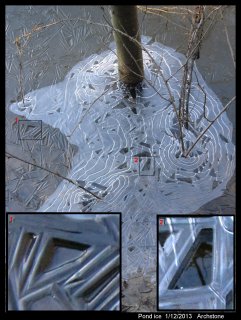
During growth of the ice above, the level of the pond dropped. You can see at the region #1, a small depression between three or four grooves. The depression suggests that the grooves formed early, and then before the intervening surface could freeze, the water-level dropped. A more extreme drop is shown in #2, where the level dropped enough for an air-gap to form (making the ice more reflective).
Another indication of faster growth of the grooves is in the image below (from the same pond).
In the above case, the pond had previously had snow. Thus, the region in the middle retained slush while the region nearer shore completely melted (note how the surface is bumpier and dirtier at the top, which is nearer the middle). Then, after a cooling period, ice from the slushy center region sprouted some of these grooves, which grew outward, toward the shore.
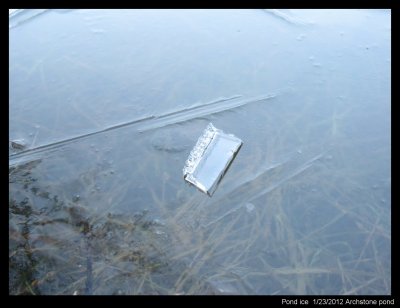
In the above image, the grooves appear to be surrounded by liquid water. But actually, this very smooth surface is a thin layer of ice. The image below shows another piece of ice that I tossed onto the surface. It rests on top.
Ice on stagnant water does not always have a lot of grooves. Sometimes, it is so thin, you can hardly see it. But these grooves still have a lot of puzzles. Someday, I hope to have a clearer understanding about how they form and grow. So, consider this just "part I" on puddle grooves.
--JN


